
How to create the eks cluster in AWS
What is the EKS Cluster
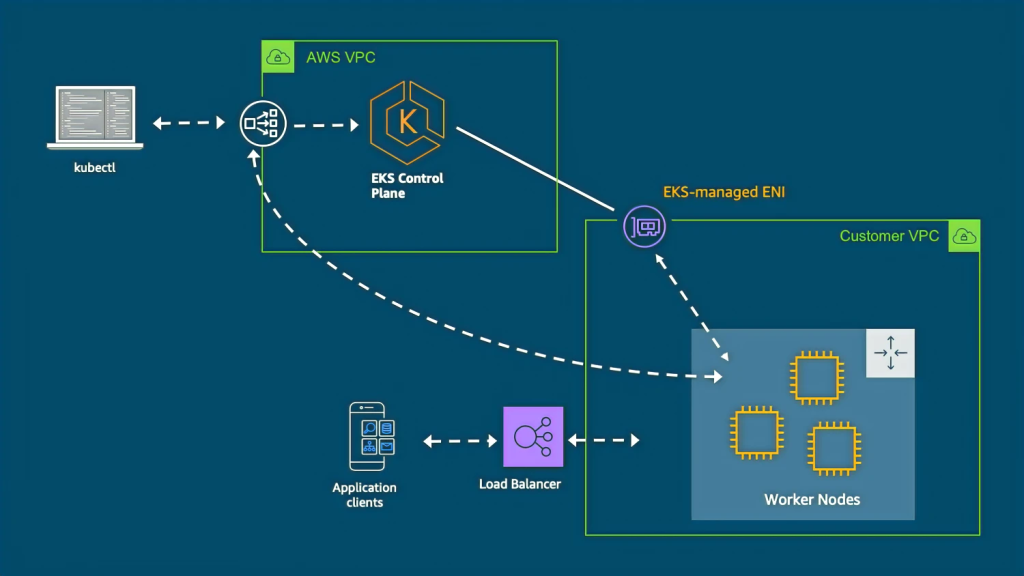
Amazon Elastic Kubernetes Service (Amazon EKS) is a managed Kubernetes service provided by Amazon Web Services (AWS). It simplifies the process of deploying, managing, and scaling containerized applications using Kubernetes. Here’s an overview of the purpose and common business use cases for EKS:
Purpose of EKS:
- Orchestration: EKS allows you to easily orchestrate and manage containerized applications using Kubernetes, an open-source container orchestration platform.
- Scalability: EKS makes it simple to scale your applications by automatically provisioning and managing the underlying infrastructure resources, such as compute instances.
- High Availability: EKS ensures high availability by distributing your workload across multiple availability zones and automatically recovering from failures.
- Security: EKS provides several security features, including integration with AWS Identity and Access Management (IAM), network isolation using Amazon VPC, and encryption of data in transit and at rest.
Business Use Cases for EKS:
- Microservices Architecture: EKS is well-suited for deploying and managing microservices-based applications. It allows you to break down your application into smaller, independent services that can be scaled and updated individually.
- Continuous Integration and Deployment (CI/CD): EKS integrates well with CI/CD tools, enabling seamless deployment of containerized applications. You can automate the build, test, and deployment processes using tools like AWS CodePipeline, AWS CodeCommit, and Jenkins.
- Big Data and Analytics: EKS is commonly used in big data and analytics scenarios. It provides a scalable platform for running data processing and analytics workloads, such as Apache Spark, Apache Hadoop, and Elasticsearch, leveraging Kubernetes’ ability to scale horizontally.
- DevOps and Infrastructure Automation: EKS allows DevOps teams to automate infrastructure provisioning, scaling, and management. Infrastructure as Code (IaC) tools like AWS CloudFormation and AWS CDK can be used to define and manage EKS clusters and associated resources.
- Hybrid and Multi-Cloud Deployments: EKS supports hybrid and multi-cloud deployments, enabling you to run your containerized workloads across different environments seamlessly. This flexibility is particularly useful for organizations with multi-cloud strategies or those transitioning from on-premises infrastructure to the cloud.
These are just a few examples of how businesses can leverage EKS to simplify the deployment and management of containerized applications, improve scalability, and enhance the overall efficiency of their infrastructure. The specific use cases will vary depending on the organization’s needs and requirements.
How to Create Amazon Elastic Kubernetes Service (Amazon EKS) cluster, you can follow these general steps:
- Set up the AWS CLI: Install and configure the AWS Command Line Interface (CLI) on your local machine. This tool will allow you to interact with AWS services from the command line.
- Create an IAM role: Create an IAM role with the necessary permissions to manage the EKS cluster. This role should have policies like
AmazonEKSClusterPolicyandAmazonEKSServicePolicyattached. - Create a VPC: If you don’t have a Virtual Private Cloud (VPC) already, create one using the AWS Management Console or CLI. The VPC will provide networking for your EKS cluster.
- Create subnets: Create two or more subnets within your VPC, each in a different availability zone (AZ). These subnets will be used by your EKS cluster’s worker nodes.
- Create a security group: Create a security group that allows inbound and outbound traffic for your cluster.
- Create an EKS cluster: Use the AWS Management Console or CLI to create the EKS cluster. Specify the VPC, subnets, security group, IAM role, and any other desired configurations.
- Configure kubectl: Install and configure the Kubernetes command-line tool, kubectl, on your local machine. This tool will be used to interact with your EKS cluster.
- Connect to the cluster: Update your local kubeconfig file with the necessary credentials to connect to the EKS cluster. This can be done using the AWS CLI command
aws eks update-kubeconfig. - Launch worker nodes: Create an Amazon Machine Image (AMI) with the necessary configurations for your worker nodes. Then, use an Auto Scaling Group (ASG) to launch worker nodes within your subnets. The ASG will automatically adjust the number of nodes based on the workload.
- Verify the cluster: Use the
kubectlcommand-line tool to verify that you can access and manage your EKS cluster. For example, you can runkubectl get nodesto see the worker nodes.
These steps provide a general overview of the process. Keep in mind that there may be additional configurations or customizations required based on your specific needs and infrastructure setup. It’s recommended to refer to the official Amazon EKS documentation for more detailed instructions and best practices.
Fast way to create the eks cluser via eks command line tools as mention in below
To create an Amazon Elastic Kubernetes Service (EKS) cluster using the EKS CLI commands, you’ll need to have the AWS CLI and EKS CLI installed on your local machine. Here’s a step-by-step guide to creating an EKS cluster:
- Install and configure the AWS CLI: If you haven’t done this already, you can follow the instructions in the AWS CLI documentation to install and configure the AWS CLI with your AWS credentials.
- Install the EKS CLI: You can install the EKS CLI using the following command:
bashCopy codecurl --silent --location "https://github.com/weaveworks/eksctl/releases/latest/download/eksctl_$(uname -s)_amd64.tar.gz" | tar xz -C /tmp
sudo mv /tmp/eksctl /usr/local/bin
- Create an EKS cluster: Run the following command to create a basic EKS cluster:
cssCopy codeeksctl create cluster --name <cluster-name> --region <region> --nodegroup-name <nodegroup-name> --node-type <node-instance-type> --nodes <number-of-nodes>
Replace the placeholders with your desired values:
<cluster-name>: The name you want to give to your EKS cluster.<region>: The AWS region where you want to create the cluster (e.g.,us-east-1).<nodegroup-name>: The name you want to give to the node group.<node-instance-type>: The EC2 instance type for the worker nodes (e.g.,t3.medium).<number-of-nodes>: The number of worker nodes you want to create.
For example, the command may look like this:
eksctl create cluster --name my-cluster --region us-east-1 --nodegroup-name my-nodegroup --node-type t3.medium --nodes 3
- Wait for the cluster creation: The cluster creation process may take several minutes. The command will output the progress and status of the cluster creation. Wait until the cluster is created successfully.
- Configure
kubectl: After the cluster is created, you need to configurekubectlto communicate with your EKS cluster. Run the following command:
aws eks --region <region> update-kubeconfig --name <cluster-name>
Replace <region> with the AWS region of your cluster, and <cluster-name> with the name you provided in step 3.
For example:
aws eks --region us-east-1 update-kubeconfig --name my-cluster
Now you should be able to use kubectl to manage your EKS cluster.
That’s it! You have created an EKS cluster using the EKS CLI commands. Remember to clean up your resources when you no longer need them to avoid incurring unnecessary costs.