
How to host website on the aws s3 bucket
To host a website for an Angular application on AWS S3, you can follow these steps:
- Create an S3 Bucket: Open the AWS Management Console and navigate to the S3 service. Click on “Create bucket” and provide a unique name for your bucket. Choose the AWS region and configure other settings as needed. Ensure that the bucket name aligns with the desired website URL, as it will be used in the website’s endpoint.
- Enable Static Website Hosting: Once the bucket is created, select it from the S3 bucket list. Go to the “Properties” tab and click on “Static website hosting”. Choose the “Use this bucket to host a website” option and enter the index document name (usually “index.html”) and an optional error document name.
- Configure Bucket Policy: To allow public access to the website content, you need to configure a bucket policy. Under the “Permissions” tab, click on “Bucket Policy” and enter the following policy:
jsonCopy code{
  "Version": "2012-10-17",
  "Statement": [
    {
      "Sid": "PublicReadGetObject",
      "Effect": "Allow",
      "Principal": "*",
      "Action": "s3:GetObject",
      "Resource": "arn:aws:s3:::your-bucket-name/*"
    }
  ]
}
Replace “your-bucket-name” with the actual name of your S3 bucket.
- Upload Angular Application Files: Upload your Angular application’s compiled static files to the S3 bucket. This typically includes the “index.html” file and other generated assets (CSS, JavaScript, images, etc.). You can use the AWS Management Console, AWS CLI, or any S3 client tool to upload the files.
- Test the Website: Once the files are uploaded, you can test the website by accessing the S3 bucket’s website endpoint. Go to the “Static website hosting” section under the bucket properties and copy the “Endpoint” URL. Paste it into a web browser, and you should be able to view your Angular application.
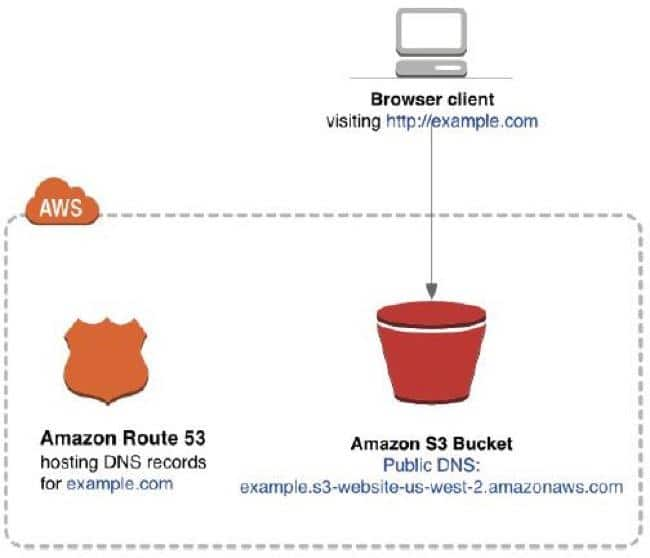
- Configure DNS (Optional): If you want to use a custom domain for your website, you can configure DNS settings to map your domain to the S3 bucket’s website endpoint. This involves creating a DNS record (such as a CNAME or an Alias record) that points to the S3 bucket’s endpoint. The exact steps for configuring DNS depend on your DNS provider.
you can host your Angular application as a static website on AWS S3. AWS S3 provides a highly scalable and cost-effective solution for hosting static websites with good performance and reliability.
Here’s an example of an Angular application code, along with the steps to deploy it to an AWS S3 bucket:
- Create an Angular Application:
- Install Angular CLI globally by running the following command in your terminal:bashCopy code
npm install -g @angular/cli - Create a new Angular application by running the following command:arduinoCopy code
ng new angular-app - Change to the application’s directory:bashCopy code
cd angular-app - Serve the application locally to verify it’s working:Copy code
ng serve
- Install Angular CLI globally by running the following command in your terminal:bashCopy code
- Build the Angular Application:
- Build the Angular application using the following command:cssCopy code
ng build --prod - This command generates a
distfolder in the project directory, containing the compiled and optimized version of your Angular application.
- Build the Angular application using the following command:cssCopy code
- Create an S3 Bucket:
- Log in to the AWS Management Console and navigate to the S3 service.
- Click on “Create bucket” and provide a unique name for your bucket.
- Choose the AWS region and configure other settings as needed.
- Upload the Angular Application Files to the S3 Bucket:
- Select the S3 bucket you created and click on the “Upload” button.
- In the file upload dialog, select all the files and folders inside the
distfolder of your Angular application. - Complete the upload process to store the application files in the S3 bucket.
- Configure S3 Bucket for Static Website Hosting:
- Select the S3 bucket and go to the “Properties” tab.
- Click on “Static website hosting” and choose the “Use this bucket to host a website” option.
- Enter the index document name, typically “index.html”, and an optional error document name.
- Save the changes.
- Test the Deployed Angular Application:
- Go to the “Static website hosting” section under the bucket properties.
- Copy the “Endpoint” URL, which represents the URL where your Angular application is hosted.
- Paste the URL into a web browser, and you should be able to see and interact with your deployed Angular application.
That’s it! Your Angular application is now deployed and hosted on the AWS S3 bucket. Users can access the application through the S3 bucket’s website endpoint URL. Remember to configure proper access permissions and security measures for your S3 bucket to protect your application files.